The primary purpose of leaf springs is to offer the passenger a comfortable ride by reducing the vertical vibration produced by roadway variations. But what if your Chevy Silverado Leaf springs start to break, crack, lean, or sag over time?
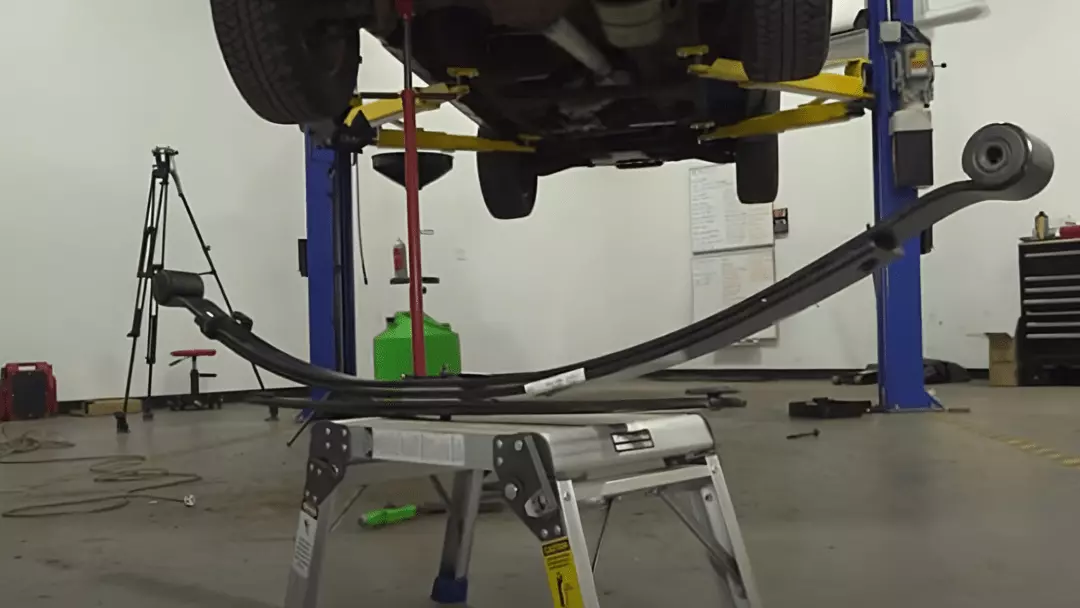
You’ll need to remove and replace the suspension system. But how do you remove a leaf spring in a Chevy Silverado? Park the vehicle on level ground, lift the rear to access the leaf springs, detach the base plate, remove the old leaf springs, and reattach some parts before replacing the new leaf springs or suspension system.
So, do you want to go back to enjoy the smooth riding experience one more time? Replace the leaf springs according to our guidelines, which are included below. We can ensure that the next ride will be more responsive and resistant.
Contents
- 1 How Are Leaf Springs Attached?
- 2 Can You Remove Leaf Springs On Chevy Silverado?
- 3 Is It Hard To Remove Leaf Springs?
- 4 How To Determine The Worn-Out Leaf Springs On Chevy Silverado
- 5 What Causes a Leaf Spring to Break?
- 6 Is A Broken Leaf Spring Safe To Drive With?
- 7 How To Remove A Leaf Spring In A Chevy Silverado – Quick Fix
- 8 How To Replace Leaf Spring Chevy Silverado – Instructions To Follow
- 9 FAQ
- 10 Wrapping Up
How Are Leaf Springs Attached?
Generally, leaf springs are linked directly to the frame at the sides. Or potentially fastened directly at one end (front), with the other side linked through a shackle. More specifically, the end of your vehicle’s leaf springs is connected to the chassis of the Chevy Silverado, and the axle is linked to the middle.
Can You Remove Leaf Springs On Chevy Silverado?
No doubt, you can remove the leaf springs from your Chevy Silverado, and the broken leaf spring quick fix is possible with the assistance of a floor jack. Also, you can use a hydraulic jack to lift the vehicle at least 3″ at the rear end and position a jack stand beneath the rear axle. After that, you can remove the loosened lug nuts and slip off the back wheels.
Is It Hard To Remove Leaf Springs?
Conceptually, removing and replacing the leaf springs is simple work, but you’ll have to perform many tasks to fix it. When removing the leaf springs, you will possibly notice some conditions like:
- Generally, you will find a shackle where you must remove both nuts.
- Also, you will have to check for the symptoms of bad leaf spring shackles.
- The difficulty comes when you notice everything is unclean and rusted.
- On the other hand, if the vehicle is large enough, the spring will surely be heavy. So, you must block the vehicle under the frame to keep the spring neutral.
- Attempting to match up the new spring with the old one attached on the opposite side can be slightly frustrating.
- After the replacement, you may also notice the vehicle sits higher on the side, indicating that you need to replace the opposite spring.
How To Determine The Worn-Out Leaf Springs On Chevy Silverado
Some signs indicate your vehicle is having suspension issues. So, prioritize the facts and give immediate attention while encountering such issues.
- Having difficulties hauling and lifting loads.
- Proper handling issue.
- Leaves have cracks.
- When moving a vehicle, a squeaky noise is coming.
- Slouching solely in one direction
- Rear sagging.
- The suspension bottoms out when you encounter a bump in the road.
What Causes a Leaf Spring to Break?
Assuming that your 1995 Chevrolet 1500’s back leaves come in six packs, you are having a terrible riding experience nowadays. However, you should know that driving the car on the highway or roadside can keep the springs from wearing out until around 100,000 miles.
Actually, your car may experience an early leaf spring failure for various reasons. So, let’s see what’s causing the suspension system to fail.
- A faulty suspension system can set off a chain reaction that harms the weight.
- When the u-bolts are not properly torqued, the center bolts of the leaf springs might break or shear.
- Torsion or twisting can happen due to road surface difficulties.
- An overloaded Chevy Silverado can break the integral part or leaf springs.
- Time, usage, and elements can also cause corrosion and fatigue.
Also Read: Difference Between Silverado 1500 and 1500hd
Is A Broken Leaf Spring Safe To Drive With?
Yes, you can drive, but you shouldn’t, as your vehicle will get damaged more and more. If it’s urgent, like taking the vehicle to the repair shop. However, riding is typically not advised because your car won’t respond correctly to unexpected movements.
Potentially, with a broken rear spring, your car will transfer its weight abruptly during emergency maneuvers, and that can cause your tires to lose their grip and cause you to lose control of the vehicle. Additionally, the defective spring, whether a leaf or a coil, may collapse, releasing heavy metal fragments into the road and making it unsafe.
How To Remove A Leaf Spring In A Chevy Silverado – Quick Fix
What keeps the car in good form is regular leaf spring maintenance. Thus, be careful not to neglect the leaf springs to protect the vehicle from the possibility of worn-out problems.
Hearing the squeaking when driving over a rough roadside or a scraping sound will demand an immediate decision to troubleshoot the suspension issue. Or, if you decide to remove the leaf springs, please follow the steps we have included below.
- First of all, block the tires, then lift the Chevy Silverado.
- Then, place the jack stands under the axle, both for safety and to keep the axle in place.
- After that, remove parts such as the tire, shock, U-bolts, rear shackle, and front eye bolt.
- And finally, everything is in your hands, so take the old spring in your hand.
How To Replace Leaf Spring Chevy Silverado – Instructions To Follow
So, we are done removing the old, damaged leaf springs. Suppose it was a heavy-duty leaf-spring Chevy 1500. Now, we will reinstall the new leaf spring on this Chevy Silverado. Unless you are familiar with the replacement, it is recommended that you take your vehicle to a Chevy mechanic.
Things That You Need
If you have the proper tools and are willing to install the new leaf springs, you’ll be 100% successful. Before replacing the leaf spring on the Chevy, make sure you collect things such as:
- New replacement leaf springs
- Floor jack
- Jack stands
- Penetrating oil
- Ratchet wrench
Take Your Preparation
Prepare your previous suspension before installing the springs. We suggest waiting at least three days before you plan to remove the old springs.
Old leaves can get rusted, so removing them without damaging any nearby components that might be utilized again after the old spring has changed is crucial. While doing spring replacement, you can rub oil around your vehicle’s bolts, nuts, and brackets to loosen the suspension system.
Lift The Chevy Silverado
Now, move the car to a flat, stable surface for safety. Choosing a concrete driveway or workshop is something we highly recommend. Afterward, you will need wheel chock wedges that fit under the tires to stop the vehicle from rolling. In this circumstance, one of the chocks should be inserted under the front side and the second chock behind the similar tire.
On the other hand, placing a jack stand beneath the back axle and sliding the floor jack under the back end is what you need now. We usually do the hydraulic lift of the vehicle’s rear end by at least 3 inches (7.6 cm).
Don’t you think we should know the step-by-step lifting technique? Of course, you need it! Therefore, place your jack stands in front of your rear tires. Set the stands 2.5 centimeters or 1 inch before your rear wheels. And don’t forget to push against the car to check for any signs of wobbling.
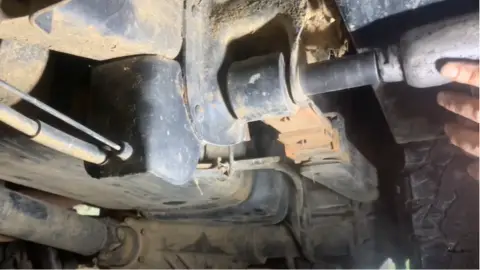
Pulling The Old Springs
In this step, you must find the bottom mounting stud and pull out the bolts and other necessary components to remove the shock absorbers. You must remove the base plate by unfastening the U-bolt fasteners properly. A good suggestion for car specialists is to use WD-40 or other penetrating oil for the spring nuts and bolts.
Additionally, you must remove the bolt from the shock pads using a ratchet wrench. Use the eyelet bolts on the ends of the spring, and then repeat the process to detach your second leaf spring.
Also Read: Why is my car leaking oil
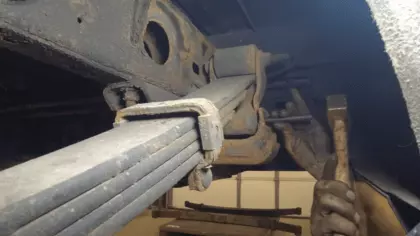
Install The New Leaf Spring
The replacement part has finally arrived! Now, you must put the leaf springs in place and secure them to your hangers by including the mounting bolts and nuts at either end.
Complete the Installation
The spring needs to be attached to the back bracket. The old nuts and bolts can be worn out; therefore, it would be preferable to use new parts. After that, re-install the U-bolts and shock pad, position the nuts underneath the pads, and tighten them properly to assemble.
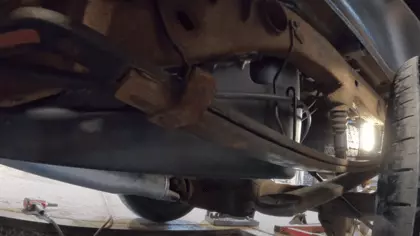
Tighten Everything Properly
Remember, a secure installation is the core part! So, you have to tighten everything correctly. After putting it in, you can remove the floor jacks and lower the Chevy. Moreover, please pay attention to the Chevy Silverado’s leaf spring installation and listen for any rattling noise indicating loose components.
FAQ
If you are confused about the leaf spring removal, you can check the frequently asked questions section. The Q&A section is made according to the user’s demands.
1. How do you remove a leaf spring pin?
Get a large c-clamp and clamp the springs together to prevent them from falling apart while removing the spring pin. On the other hand, use vice grips on the pin side and wrenches on the opposite side. But any rusty place needs to be cut off, as there is a chance of breaking when you start to torque it.
2. Can you lower a truck by flipping the leaf springs?
Leaf springs are great for lowering the ride height by 2 to 3 inches. The back can be lowered 4 inches if such springs are combined with new lowering spring eye hangers.
Moving the axle farther from the springs and lowering it, utilizing the block with large u-bolts, is good. And if the axle is lifted below your vehicle’s springs, get a flip kit that works like a spacer to enable the axle to be mounted above the springs.
3. How do you remove pressure from a leaf spring?
The pressure on the spring can be reduced by putting an extra floor jack underneath. Additionally, the axle’s bolts must be removed by sliding them.
4. Can I replace just one leaf spring?
Although changing one spring can be done technically, you should change the pair of springs together. Most of the time, altering one spring makes the car stand at an angle. When one leaf breaks, others break, wear out, and crack over time.
Wrapping Up
So, did you learn how to remove a leaf spring in a Chevy Silverado? Learn how the leaf springs are attached and how they work, and then you can remove and install the new leaf springs on your Chevy.
Remember that suspension system faults, loose bolts, overloads, twisting, usage, and component quality will indicate when you should replace the leaf springs. While installing, ensure you give importance to tightening everything properly, utilize the floor jack, and do a driving test to ensure you have attached the new pair of springs like a professional.

Hello, this is Wesley Shelton, currently working in a car restoration company for over 5 years. Before that, I was a worker at a small car repair shop. As I was a car freak from a young age and worked as a professional for over half a decade, I think I now know pretty much everything about every car and its parts. To establish my name as a professional and help others by sharing my knowledge, I’ve created this website, which I work on whenever I get free time. I hope you’ve enjoyed my informative blog!
