Are you looking to give your GMC Sierra 1500 a boost in performance? A cold air intake (CAI) system might just be the upgrade you need. Not only can it improve horsepower and torque, but it can also give your engine that satisfying growl during acceleration. The best part? You can install it yourself. Let’s walk through the process together.
Contents
- 1 Understanding Your GMC Sierra’s Current Intake System
- 2 Pre-Installation Preparation
- 3 Removing the Stock Intake System
- 4 Assembling the Cold Air Intake Kit
- 5 Installing the Cold Air Intake
- 6 How Much Does a Cold Air Intake Install Cost
- 7 Post-Installation Checks and Testing
- 8 FAQs For Install A GMC Sierra Cold Air Intake 1500
- 9 Conclusion
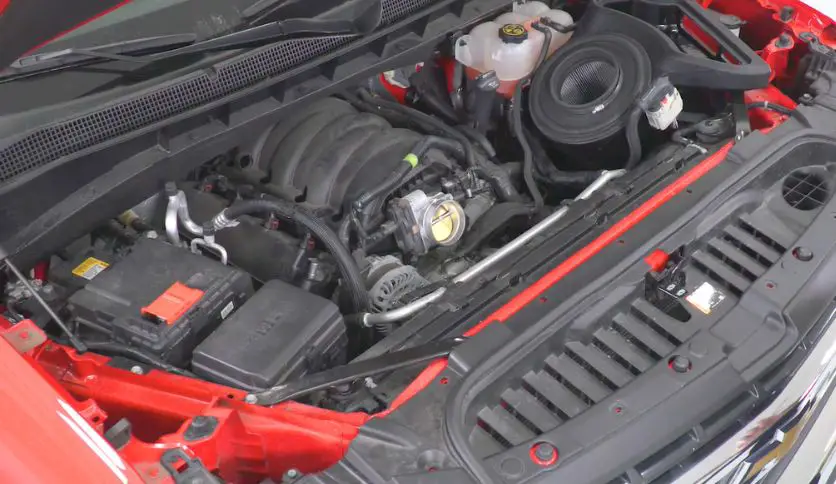
Understanding Your GMC Sierra’s Current Intake System
Take a moment to familiarize yourself with your Sierra’s current setup. Your stock intake system might look a bit daunting, but it’s just a series of tubes and clamps. Remember, safety first! Always work on a cool engine and disconnect the battery to prevent any electrical mishaps.
Pre-Installation Preparation
Before we dive under the hood, let’s make sure you have everything you need. Grab a basic toolkit, which should include screwdrivers, pliers, a ratchet and socket set, and maybe a friend to lend a hand. You’ll also need your CAI kit, which should be designed specifically for your Sierra’s model year.
Removing the Stock Intake System
Upgrading your GMC Sierra 1500 with a choose best cold air intake for GMC Sierra begins with the removal of the old, stock intake. This process is not just about making room for the new unit, but also about understanding the layout and connection of your vehicle’s components. Let’s break down these steps for a smooth removal process.
Disconnecting the Battery
Safety should always be your top priority when working on your vehicle. The first step in the removal process is to disconnect the battery, starting with the negative terminal. Why the negative first? It’s the ground, and removing it first minimizes the risk of a short circuit when you work on the rest of the engine. Use a wrench to loosen the nut on the negative terminal, then pull the cable off and tuck it to the side, ensuring it doesn’t touch any metal parts. Some folks like to wrap it in a cloth just to be extra safe.
Dismantling the Original Intake
With the battery disconnected, you can now focus on the stock intake system. The factory-installed intake is typically a large plastic tube with several connecting hoses and possibly sensors, depending on your Sierra’s model year.
Loosening the Clamps
Start by loosening the clamps that secure the intake tube to the airbox and the throttle body. These are usually tightened with a screwdriver or a socket wrench. Turn them counterclockwise until they’re loose enough to move but don’t fully remove them just yet.
Disconnecting Sensors
Modern vehicles are equipped with various sensors, such as the mass airflow sensor (MAF), which are attached to the intake system. It’s crucial to disconnect these sensors carefully to avoid damaging them. Most sensors will have a small clip or a tab that you need to press or slide to disconnect. Take your time and be gentle — these components are sensitive and can be costly to replace.
Removing Screws and Bolts
As you detach the intake, you’ll encounter a series of screws and bolts that hold it in place. Use the appropriate screwdriver or socket to remove them. As you do this, keep all the hardware organized. A magnetic tray can be a lifesaver here, keeping those metal pieces from disappearing into the dark corners of your garage.
Wiggling the Intake Free
Once all clamps, screws, and sensors are disconnected, the intake tube should be free. However, it might require a bit of finesse to remove it from the engine bay. Wiggle the tube gently to free it from its seating. If it resists, double-check to make sure you haven’t missed any connections.
Inspecting the Area
With the stock intake removed, take a moment to inspect the area. This is a great opportunity to clean any accessible parts of the engine and to check for any wear or damage. Look for any cracks in the hoses or buildup that could affect the performance of your new cold air intake.
Removing the stock intake system is a straightforward process that sets the stage for your GMC Sierra 1500’s performance upgrade. By following these steps carefully, you ensure a clean removal and prepare your truck for the exciting improvements that come with a cold air intake system.
Assembling the Cold Air Intake Kit
With the old intake system out of the way, it’s time to turn your attention to the exciting part: assembling your brand-new cold air intake (CAI) kit. This is where you’ll start to see the fruits of your labor, but it’s also a stage that requires careful attention to detail. Let’s get started.
Preparing the New Intake Components
Open your CAI kit and spread out all the components. You should have a clear space on the ground or a large workbench. Here’s what you’re likely to find in your kit:
- Intake Tube: This is the backbone of your CAI system, designed to channel cooler air into your engine.
- Air Filter: The high-flow filter is crucial for allowing more air into the engine while keeping contaminants out.
- Couplers and Clamps: These are used to connect the various parts of the intake system securely.
- Hardware Kit: This will include all the necessary screws, bolts, and brackets.
- Heat Shield or Air Box: Many CAI systems come with a heat shield to keep hot engine air away from your intake.
Lay these parts out like you’re about to start a jigsaw puzzle. It’s helpful to group similar items together and to have the instruction manual open for reference.
Step-by-Step Assembly
- Start with the Air Filter: Attach the air filter to the intake tube. It should slide on easily, and you can secure it with a clamp. Make sure it’s tight enough that the filter won’t come off, but not so tight that it damages the filter or the intake tube.
- Assemble the Heat Shield: If your kit includes a heat shield, put it together according to the instructions. It will usually require bolting several pieces together.
- Connect the Couplers: These rubber or silicone pieces are what you’ll use to connect the intake tube to your engine’s throttle body and to the air box or heat shield. Slide the couplers onto the intake tube and secure them loosely with clamps.
- Attach Brackets: If your CAI kit comes with brackets, attach them to the intake tube or heat shield as directed. These will help stabilize the intake system once installed in the engine bay.
Tips for a Smooth Assembly
- Take It Slow: Rushing through the assembly can lead to mistakes. Read each step in the manual before you do it, and make sure you understand it.
- Check the Fit: Before you tighten anything down, check how the parts fit together. If something seems off, double-check the instructions. Forcing parts can lead to damage or improper installation.
- Use the Right Tools: Make sure you have the correct size tools for the job. Using pliers where a wrench is needed, for example, can strip bolts or damage parts.
- Hand-Tighten First: Before you use any tools, hand-tighten screws and bolts to ensure they thread correctly. Cross-threading can cause significant problems.
- Look for Leaks: Once everything is assembled, give it a once-over and look for any gaps or spaces that could lead to air leaks. Every connection should be airtight.
- Refer to Resources: If you’re unsure about a step, look it up. Use online forums, video tutorials, or customer service hotlines. It’s better to seek help than to guess and make a costly mistake.
Assembling your CAI kit is a bit like putting together a high-stakes Lego set. Each piece has its place, and when everything fits together just right, you’re set for a rewarding upgrade to your GMC Sierra 1500’s performance. Take your time, follow the instructions, and you’ll be ready to install your new system in no time.
Installing the Cold Air Intake

With your cold air intake (CAI) kit assembled, you’re now ready to install it into your GMC Sierra 1500. This is where you’ll integrate the new system into your vehicle, replacing the old, restrictive intake. Proper installation is key to ensuring that your engine reaps all the benefits of the CAI, including better airflow and improved performance.
Positioning the CAI in Your GMC Sierra
Gently lift the assembled CAI and begin positioning it into the engine bay. This should be done with care to avoid any damage to the CAI components or the engine itself. The CAI should be placed in the same location where the original intake system was removed from. Here are some key points to consider during this step:
- Avoid Contact with Moving Parts: Ensure that the CAI, especially the intake tube, is not making contact with any moving parts like belts or pulleys. Vibrations from the engine can cause wear over time if there’s contact, and you want to avoid any potential for damage.
- Steer Clear of Heat Sources: The purpose of a CAI is to draw in cooler air from outside the engine compartment. Position it away from the engine block and exhaust manifold to prevent heat soak, which can diminish the performance gains you’re looking for.
- Check the Path of the Intake Tube: The tube should have a clear path for airflow. Make sure it’s not kinked or bent sharply, as this can restrict the air and negate the benefits of the CAI.
Securing the Intake and Reconnecting Components
Once the CAI is correctly positioned, it’s time to secure it in place:
- Tighten the Clamps: Go back to each clamp that holds the CAI to the couplers, throttle body, and air box or heat shield. Tighten each one so that it’s snug, but be careful not to over-tighten, as this can cause the clamps to strip or the intake tube to crack.
- Secure the Brackets: If your CAI kit included brackets, bolt them down to the designated spots on the engine or the frame. These brackets will stabilize the CAI, preventing movement that could lead to wear or detachment.
- Reconnect Sensors: Any sensors that were disconnected from the original intake system, such as the mass airflow sensor, should now be reconnected to the new CAI. These connections are typically plug-and-play, but it’s crucial to ensure they click into place securely and are free from dirt and grime.
- Double-Check All Connections: Once everything is connected, take a moment to double-check each part. Make sure every clamp, bolt, and connector is tight and properly seated. This is also a good time to inspect for any tools or parts that may have been left in the engine bay.
Final Considerations
- Visual Inspection: Look over the entire CAI setup to ensure everything looks aligned and properly fitted. There should be no undue stress on any part of the CAI or the engine’s connecting points.
- Reconnect the Battery: With the CAI installed, you can now reconnect the negative terminal of the battery. Make sure the connection is clean and tight for proper electrical function.
- Initial Test: Before starting the engine, it’s wise to perform an initial test. Check that the CAI doesn’t shift when nudged and that there’s no loose hardware.
Installing a CAI is a rewarding process that can be completed successfully with attention to detail and patience. By ensuring that the CAI is properly positioned and secured, you’ll set the stage for a noticeable improvement in your GMC Sierra 1500’s performance. Once everything is double-checked, you’re ready to fire up the engine and enjoy the fruits of your labor.
How Much Does a Cold Air Intake Install Cost
When you’re looking to enhance your vehicle’s performance, one of the first upgrades to consider is a cold air intake system. But before you make the leap, it’s essential to understand how much a cold air intake install costs. This upgrade can vary in price, and several factors come into play, such as the make and model of your vehicle, the brand of the intake system, and whether you choose to install it yourself or opt for professional installation. To get a clearer picture of the financial aspect of this modification, delve into our comprehensive guide that breaks down the costs associated with a cold air intake installation.
By doing so, you’ll be able to budget accordingly and make an informed decision that aligns with your performance goals and financial constraints.
Post-Installation Checks and Testing
Ensuring Everything is Secure
Give your work a once-over. Make sure every clamp, bolt, and connector is tight and in place. This is the time for attention to detail.
Testing the New Cold Air Intake
Reconnect your battery, start the engine, and listen. The engine should run smoothly, and you might notice a more aggressive intake sound. Take your Sierra for a gentle test drive to ensure everything is working correctly.
FAQs For Install A GMC Sierra Cold Air Intake 1500
Will a CAI void my warranty?
It shouldn’t, but always check with your manufacturer first.
Do I need to tune my engine after installation?
Not necessarily, but a tune-up can sometimes help you get the most out of your CAI.
What if my engine light comes on?
Double-check all connections, especially sensors. If the light stays on, consult with a professional.
Conclusion
Congratulations are in order! You’ve successfully navigated the technical world of automotive upgrades and installed a new cold air intake (CAI) on your GMC Sierra 1500. This isn’t just a routine replacement; it’s a performance enhancement that speaks to your dedication to your vehicle and your skills as a DIY enthusiast.

Hello, this is Wesley Shelton, currently working in a car restoration company for over 5 years. Before that, I was a worker at a small car repair shop. As I was a car freak from a young age and worked as a professional for over half a decade, I think I now know pretty much everything about every car and its parts. To establish my name as a professional and help others by sharing my knowledge, I’ve created this website, which I work on whenever I get free time. I hope you’ve enjoyed my informative blog!
