
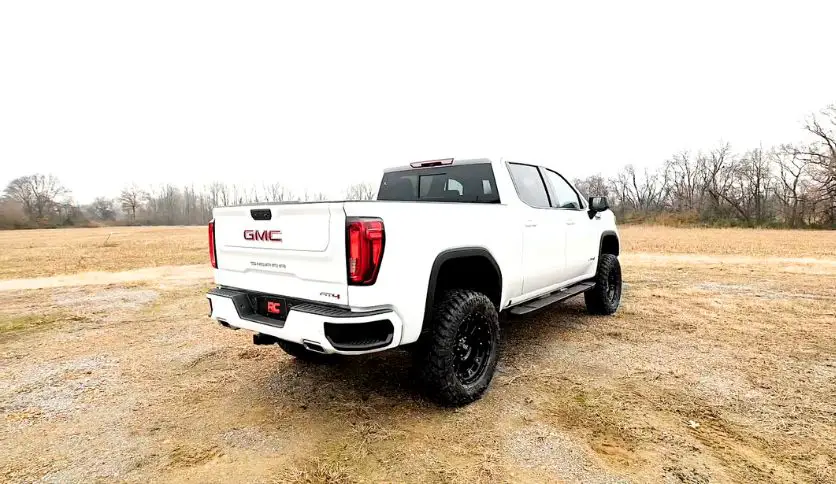
Are you looking to add a little height to your GMC Sierra 1500 4×4? A lift kit can not only boost your truck’s stature but also enhance its off-road capabilities and give it a more aggressive look. However, installing a lift kit is no small feat. It requires a good chunk of time, a bit of mechanical know-how, and a serious commitment to safety. But don’t worry—we’ve got you covered with this comprehensive guide.
Contents
- 1 Understanding Lift Kits on a GMC Sierra 1500 4×4
- 2 Pre-Installation Preparation
- 3 Removing the Stock Components
- 4 Installing the Lift Kit on Your GMC Sierra 1500 4×4
- 4.1 Step 1: Review the Manufacturer’s Instructions
- 4.2 Step 2: Organize Your Components
- 4.3 Step 3: Suspension Disassembly
- 4.4 Step 4: Installing the New Brackets
- 4.5 Step 5: Adding the Spacers or New Springs
- 4.6 Step 6: Attaching the New Shocks
- 4.7 Step 7: Adjusting Control Arms and Track Bars
- 4.8 Step 8: Reinstalling the Wheels
- 4.9 Step 9: Torquing to Specification
- 4.10 Step 10: Double-Check Your Work
- 4.11 Step 11: Post-Installation Inspection
- 4.12 Step 12: Professional Alignment
- 5 Safety and Maintenance For Lift Kit on Your GMC Sierra 1500 4×4
- 6 Legal and Insurance Considerations
- 7 Cost to Lift a Sierra 1500
- 8 Troubleshooting Common Issues
- 9 FAQs For Lift Kit on Your GMC Sierra 1500 4×4
- 10 Conclusion
Understanding Lift Kits on a GMC Sierra 1500 4×4
First things first: What exactly is a lift kit? In simple terms, it’s a set of modifications that raises the body or suspension of your truck, giving it more clearance. There are two main types: body lift kits, which raise the body away from the chassis, and suspension lift kits, which increase the overall height and improve the suspension.
Each type has its pros and cons, and the choice depends on what you’re looking for. Do you want just a cosmetic lift or are you aiming for better off-road performance? Make sure to pick a Best Lift Kits for GMC Sierra 1500 4×4 and meets your expectations.
Pre-Installation Preparation
Before diving in, gather all the necessary tools: wrenches, sockets, jack stands, and, of course, your lift kit with all its components. Safety is paramount, so double-check everything before starting. Clear out a workspace and make sure you won’t be rushed. This isn’t a job you want to speed through.
Removing the Stock Components
Lifting your truck starts with removing the old parts. Carefully jack up your Sierra and place it securely on stands. You’ll be removing the wheels, shocks, and possibly the leaf springs or control arms, depending on your kit. Keep track of all the parts and hardware—you’ll need some of them for reassembly.
Installing the Lift Kit on Your GMC Sierra 1500 4×4
Roll up your sleeves—it’s time to elevate your GMC Sierra 1500 4×4. Installing a lift kit is a meticulous process that requires precision and patience. Here’s a detailed step-by-step guide to ensure you get it right.
Step 1: Review the Manufacturer’s Instructions
- Before you touch a single bolt, thoroughly read the lift kit’s manual. Every kit is unique, and missing a step could lead to a bumpy ride, or worse, a safety hazard.
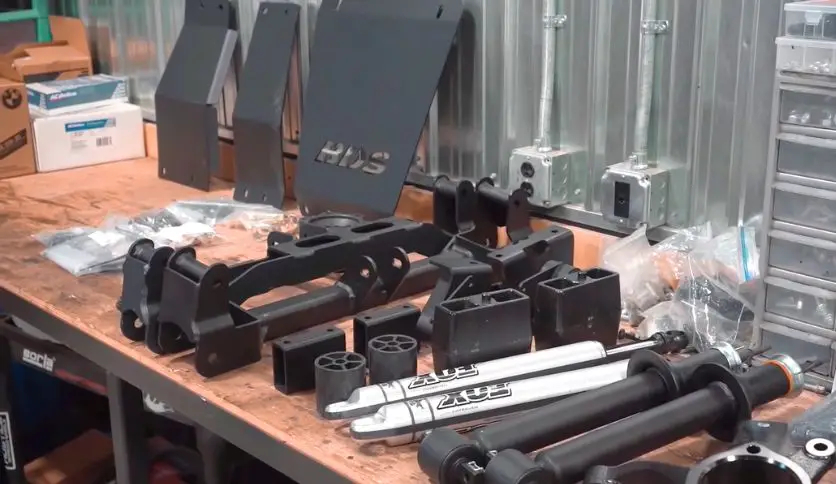
Step 2: Organize Your Components
- Lay out all the parts and tools. Familiarize yourself with each component and its place in the installation process. This will save you time and prevent confusion later on.
Step 3: Suspension Disassembly
- With the truck securely on jack stands and the wheels off, you’ll start by removing the existing suspension components. This could include the shocks, struts, leaf springs, U-bolts, and other related parts.
Step 4: Installing the New Brackets
- Fit the new brackets that came with your kit. These will typically mount to existing holes in the frame. Ensure they’re aligned correctly before bolting them down.
Step 5: Adding the Spacers or New Springs
- Depending on your type of lift kit, you may have spacers for your existing springs or entirely new springs. Install these according to the manual, making sure they seat properly.
Step 6: Attaching the New Shocks
- If your kit includes new best shocks, now is the time to install them. They’re crucial for handling and ride quality, so double-check their orientation and fit.
Step 7: Adjusting Control Arms and Track Bars
- Some kits require you to adjust or replace the control arms and track bars to accommodate the new height. Follow the kit instructions for any adjustments to ensure proper alignment and suspension geometry.
Step 8: Reinstalling the Wheels
- Once everything is in place, you can put the wheels back on. However, don’t fully tighten the lug nuts until the truck is back on the ground to ensure even torque.
Step 9: Torquing to Specification
- With the truck lowered and all four wheels on the ground, torque all the bolts to the manufacturer’s specifications. This step is vital for your safety and the longevity of your lift kit.
Step 10: Double-Check Your Work
- Go over every part you touched. Make sure every bolt is tight and every component is secure. This is the time for meticulousness—no shortcuts.
Step 11: Post-Installation Inspection
- After you’ve completed the installation, take your truck for a slow and careful test drive. Listen for any unusual noises or vibrations that could indicate something is amiss.
Step 12: Professional Alignment
- Finally, take your Sierra to a professional to have the alignment checked. This will ensure your truck drives straight and reduces tire wear.
Remember, this is a simplified guide. Your lift kit may have specific requirements or additional steps. Always refer to the lift kit’s manual for the exact process, and if you’re ever in doubt, seek the help of a professional mechanic. Installing a lift kit is a rewarding project that can greatly enhance your truck’s capabilities, but it’s crucial to do it right to ensure your GMC Sierra 1500 4×4 is safe and enjoyable to drive.
Safety and Maintenance For Lift Kit on Your GMC Sierra 1500 4×4
After your lift kit is installed, take it easy for the first few miles. Listen for any unusual noises or vibrations and address them immediately. Regular maintenance checks are crucial, especially in the first few weeks, to ensure that all parts are holding up and staying tight.
Legal and Insurance Considerations
Remember, lifting your truck might look cool, but it can also affect your insurance and warranty. Plus, there are legal limits on how high you can go. Check with your local DMV to avoid any surprises.
Cost to Lift a Sierra 1500
This varies based on the type of lift kit, the height of the lift, brand quality, and whether you opt for professional installation or a DIY approach. The cost to lift a Sierra 1500 Additional expenses like upgraded tires and potential impacts on fuel efficiency and insurance should also be considered in the total cost.
Troubleshooting Common Issues
Even with a perfect installation, you might encounter some hiccups. Common issues include unusual noises or a rough ride. Often, these can be fixed with some minor adjustments or additional tuning.
FAQs For Lift Kit on Your GMC Sierra 1500 4×4
Q: How long does it take to install a lift kit?
It can take anywhere from 4 to 14 hours, depending on your skill level and the complexity of the kit.
Q: Do I need special tools to install a lift kit?
Basic hand tools are often sufficient, but some kits may require more specialized equipment.
Q: Can I install a lift kit by myself?
It’s possible, but having an extra set of hands can make the process much smoother and safer.
Conclusion
Installing a lift kit on your GMC Sierra 1500 4×4 can transform your truck into a towering beast ready for any adventure. Just remember to take your time, follow the instructions, and prioritize safety from start to finish. Happy lifting!

Hello, this is Wesley Shelton, currently working in a car restoration company for over 5 years. Before that, I was a worker at a small car repair shop. As I was a car freak from a young age and worked as a professional for over half a decade, I think I now know pretty much everything about every car and its parts. To establish my name as a professional and help others by sharing my knowledge, I’ve created this website, which I work on whenever I get free time. I hope you’ve enjoyed my informative blog!
